How to Construct a Placenta Pit - DIY guide
In this post, you are going to learn how to construct a placenta pit from start to finish. Constructing a placenta pit is an essential task in public health engineering, particularly for healthcare facilities.
PUBLIC HEALTH ENGINEERING
How to Construct a Placenta Pit DIY guide
Table of Contents
Core Concept or Idea
Understanding the Purpose of a Placenta Pit
Step-by-Step Construction Process
Step 1: Site Selection
Step 2: Setting Out and Excavation of the Pit
Step 3: Constructing the Pit Walls
Step 4: Casting Concrete for the Ground Beam and Top Slab
Step 5: Building the Surrounding Wall
Step 6: Installing a Door or Metallic Grill
Step 7: Rendering and Finishing
Step 8: Installing the Wall Coping
Step 9: Painting
Final Touches
Conclusion
Frequently Asked Questions (FAQs)
Core concept or idea
In this post, you are going to learn how to construct a placenta pit from start to finish. Constructing a placenta pit is an essential task in public health engineering, particularly for healthcare facilities.
As a civil engineer with hands-on experience in WASH projects, I’ve prepared an easy step-by-step guide on how to build a placenta pit from start to finish. The method in this post is better because it is experience-based. I show you the exact steps we went through to accomplish this project. It provides a detailed step-by-step process for building a standard placenta pit using locally available materials. The method is simple and easy to understand; it has low operational costs and low capital costs
By following these steps, you will learn how to create a functional and safe placenta disposal system.
Understanding the Purpose of a Placenta Pit
A placenta pit is specifically designed for the disposal of pathological and biodegradable waste generated during childbirth. After delivery, the placenta and other waste materials are deposited into this pit. The majority of this waste is liquid, which seeps into the ground with ease, while the solid components decompose biologically.
It is crucial to avoid using chemical disinfectants, such as chlorine, in the placenta pit, as these can harm the microorganisms necessary for natural decomposition. The pit must also feature a local cover and a vent pipe to allow gas exchange, ensuring that harmful gases can escape while fresh air enters.
Step-by-Step Construction Process
Now that we have a clear understanding of what a placenta pit is and its function, let's dive into the construction process. This guide will break down the procedure into manageable steps.
Step 1: Site Selection
Where should a placenta pit be located?
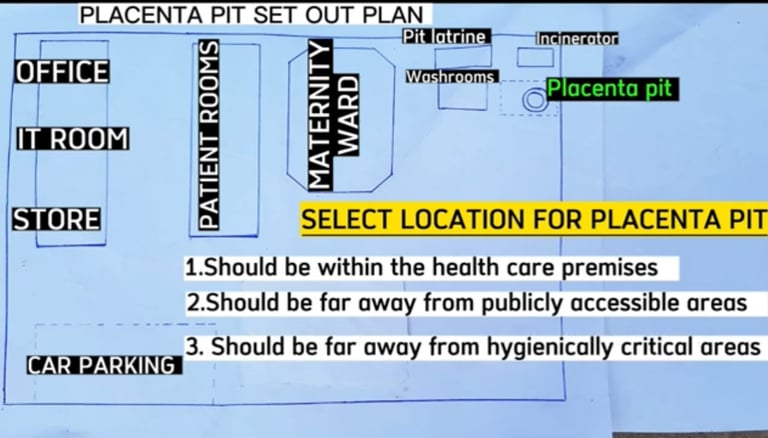
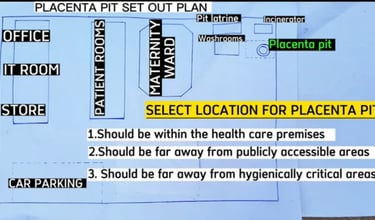
The first step is to choose an appropriate location for the placenta pit
1. Within the healthcare premises.
2. It should be situated away from public access points
3. And away from critical hygiene areas such as kitchens and water sources, usually 30 m away from a water source.
Personally, I recommend locating a placenta pit near the pit latrine, near the incinerators, or near washrooms. It’s essential to designate a placenta pit in an area strictly for waste disposal
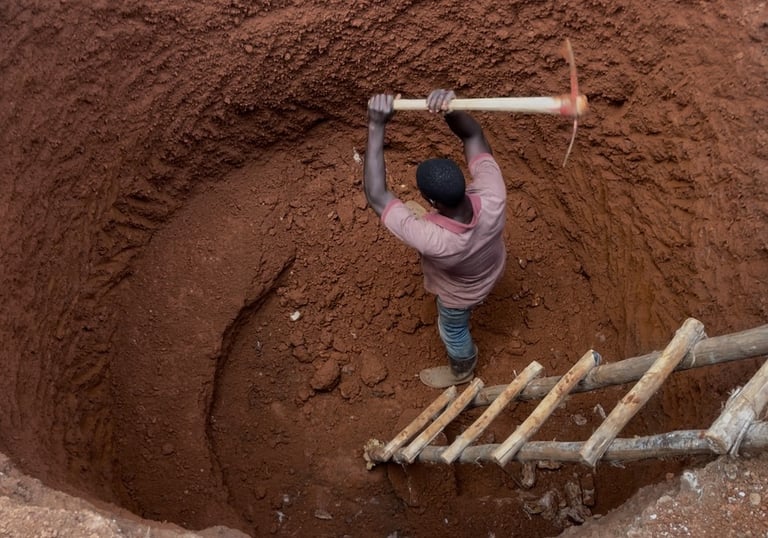
Step 2: Setting out and Excavation of the Pit
Do site clearance by cutting off small trees or shrubs and excavate top soil around your entire working area to a depth not exceeding 250 mm and dispose away from site
How deep should a placenta pit be?
Set out and excavate the pit. The dimensions depend on the average number of deliveries your facility handles daily. For example, if the average is 6 deliveries per day, the pit should have a diameter of at least one meter and a depth of 3.5 meters.
Here is a quick reference for different delivery rates
2 deliveries: 1 m diameter, 1.5 m depth
6 deliveries: 1 m diameter, 3.5 m depth
9 deliveries: 1 m diameter, 4.5 m depth
11 deliveries: 1 m diameter, 5.5 m depth
Step 3. Anti-termite treatment
After excavating the pit, do anti-termite treatment to the sides and bottom of the pit to avoid termite damage in the future
Step 4: Constructing the Pit Walls
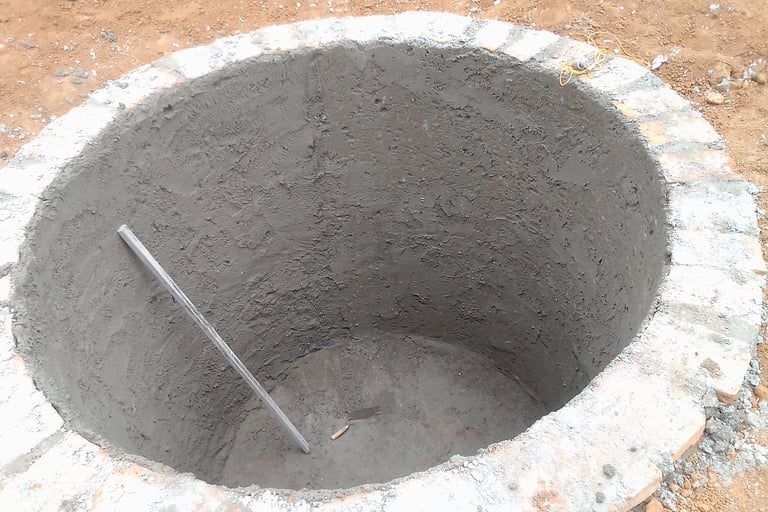
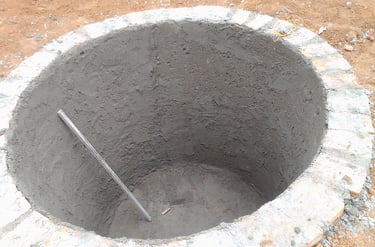
The next step is to raise the walls. Use well-burnt clay bricks or concrete solid blocks that are at least 200mm thick. Do backfilling after building the circular wall
Do not cast concrete at the bottom of the pit. We do not cast concrete at the bottom of the pit because we want the liquid remains to soak away easily into the soil
The walls should be plastered properly to ensure durability; add water-proofing powder or liquid to the plaster.
And then do a steel float finish to the inside surface with a watery mixture of cement and water
Any debris that falls into the pit during construction must be removed to allow proper soaking of sewage into the ground.
Apply black bituminous paint on the internal surface of the walls
The next step is to raise a plinth wall for a brick wall fence around the placenta pit up to the ground top beam level
Lay hardcore and do sand blinding on the area between the placenta pit and brick wall fence
Lay DPM on top of the sand blinding
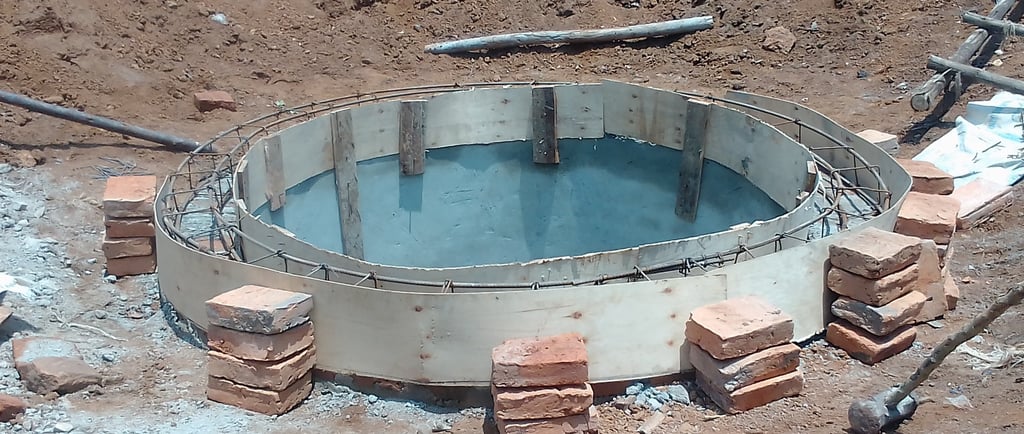
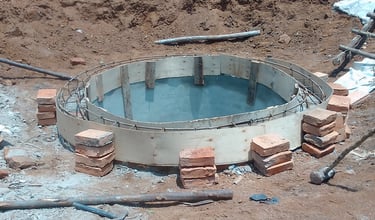
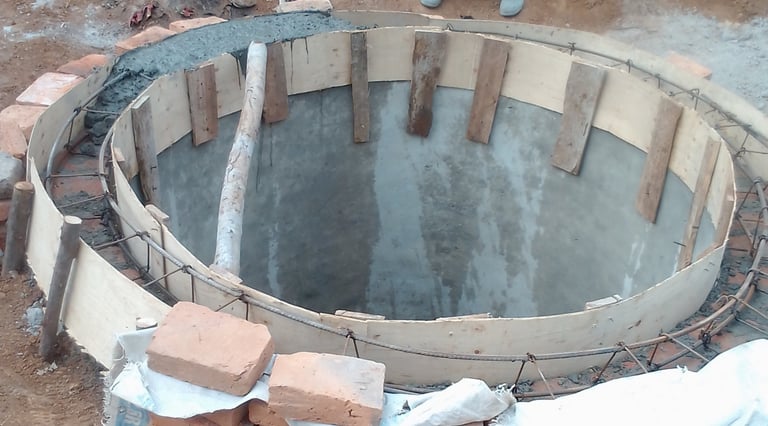
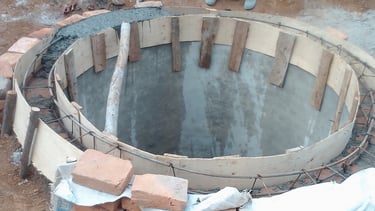
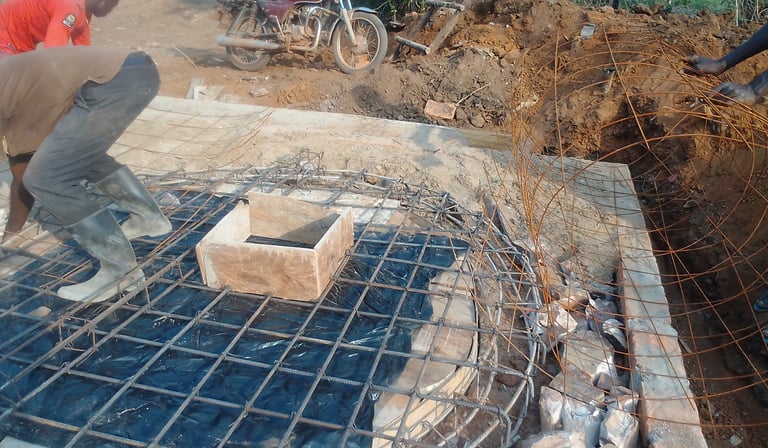
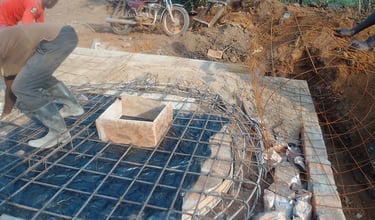
Step 4: Do steel fixing for the ground beam and top slab
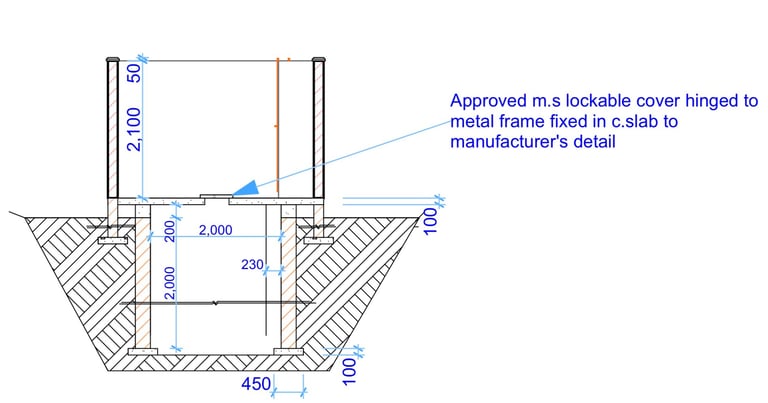
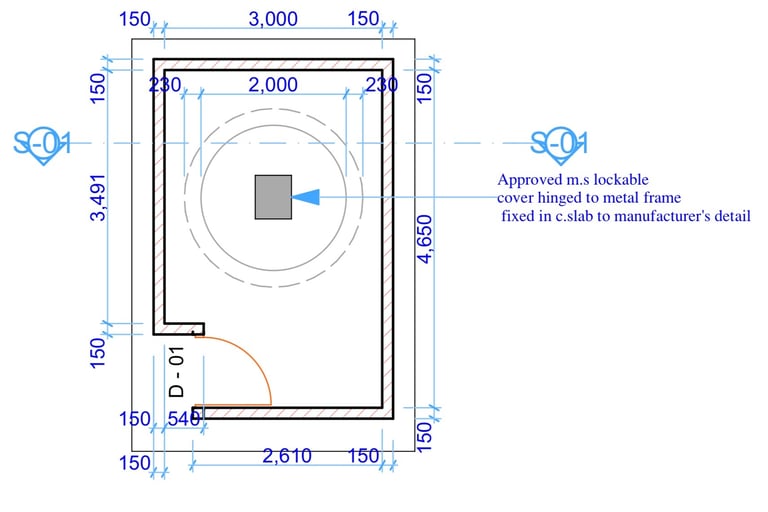
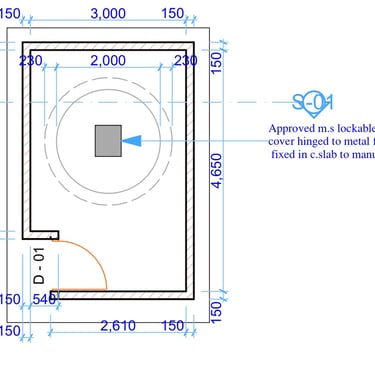
Once the walls are constructed, the next step is to cast a concrete beam around the top of the walls and also the top slab, covering the entire area. Use plywood or any suitable material that is able to fold into circular form for formwork. Reinforce this beam with steel bars. You can use Y12 steel bars depending on the Engineers structural drawing details
Casting concrete for the ground beam and top slab
Leave an opening for waste disposal and also an opening for a vent pipe necessary for gas exchange. The concrete for the slab should be at least 100 mm thick.
Cast concrete for the top slab and beam simultaneously
Use a concrete mix ratio of 1:2:4 (one part cement, two parts sand, and four parts aggregates).
Step 5: Building the Surrounding Wall
In this step, you will construct a brick wall or hollow block wall around the placenta pit. On top of the slab. The walls will be to a height of around 2.1 meters. Reinforce the walls with hoop iron after every three courses
Also build a splash apron slope to fall
Step 6: Install a door or metallic grill to prevent unauthorized access
Install the lockable cover on the placenta pit opening
Fix a vent pipe for gaseous exchange that exceeds above the height of the surrounding wall
Do flooring with a slope to take away water to prevent any stagnant water from being contained on the floor. The floor finishing should be sloped towards the entrance to facilitate easy water drainage
Step 7: Rendering and Finishing
Render the walls using a mix ratio of 1:4 (one part cement to four parts sand) for a smooth finish. This ensures that the walls are not only functional but also visually appealing.
Spread rough cast on the walls to protect it since it has no roof
Also add a skirting both inside and outside the placenta pit
Step 8: Installing the Wall Coping
Install coping on top of the wall to protect against adverse weather conditions.
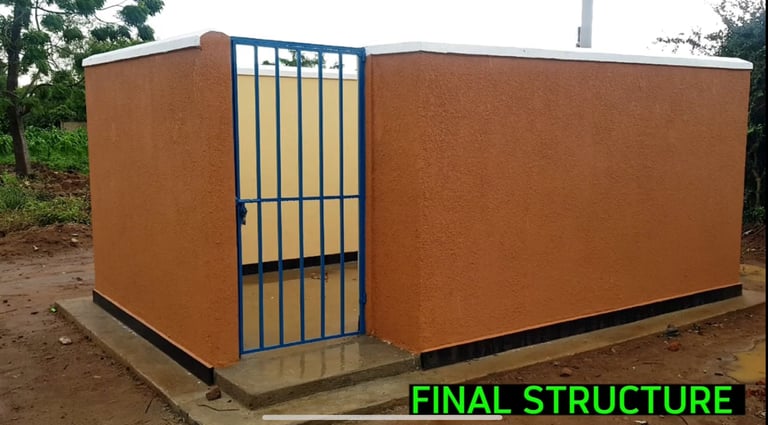
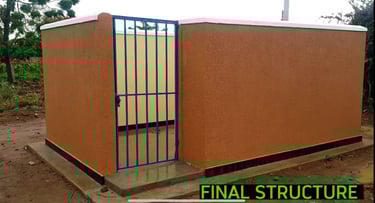
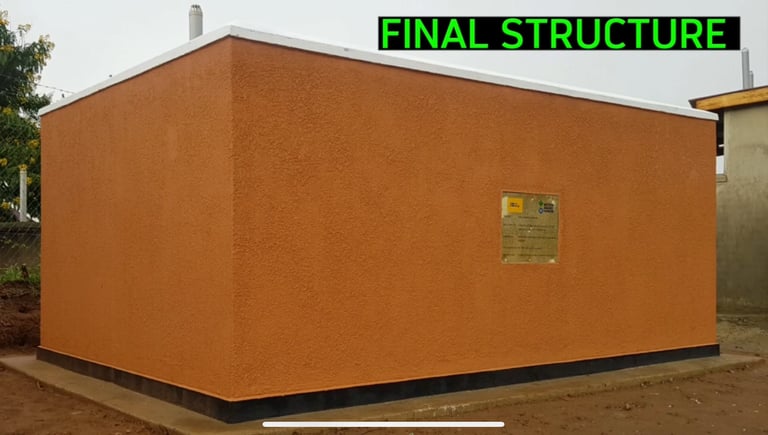
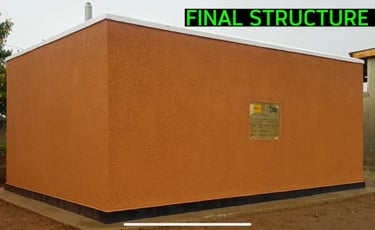
Step 9: Painting
Finally, paint the walls using weather-resistant paint. Ensure you apply two coats of undercoat followed by three coats of the final weatherguard paint, both inside and outside. We use weather guard paint everywhere since the structure has no roof colour.
Also apply gloss paint on the entrance metal grill and also on the lockable cover of the placenta pit.
Step 10: Final Touches
Be sure to also remove the timber supports (de-shuttering) underground in the pit that was used to hold the slab
Finally, do landscaping in a way that is able to prevent running storm water from reaching the placenta pit area
Clean the floor with clean water and soap and handover the work the client
Provide 2 padlocks, one on the metal grill and other on the lockable cover, to prevent unauthorized access
Conclusion
Constructing a placenta pit is a vital project for healthcare facilities, ensuring safe and effective disposal of biological waste.
By following the steps above as we did it from start to finish, you can build a placenta pit that meets health and safety standards while being environmentally friendly. Remember, proper maintenance and regular inspections are key to the longevity and functionality of your placenta pit.
For those interested in public health engineering, this construction process is just one example of how proper waste management can contribute to healthier communities.
Frequently Asked Questions
Why is a placenta pit so important?
It ensures proper hygienic disposal of placenta remains after birth, hence reducing the risk of spreading diseases
What materials are needed to build a placenta pit?
You’ll need bricks, 1 pvc 100mm diameter pipe to act as a vent pipe with its flycover , sand cement and aggregates, dpc, dpm, paint, metal grill and a lockable cover for the pit to prevent unauthorized access
How do I maintain a placenta pit?
Ensure the pit is always covered with a lockable cover and also provide a metal grill door to ensure that it only serves the purpose it was meant for
What do I do when my placenta pit gets full? Can a placenta pit be reused?
When a pit is filled, seal it and dig a new one
What type of cover should be used for a placenta pit?
A concrete slab with a small opening. The opening must have a lockable cover to prevent animals from entering the pit
How much does it cost to build a placenta pit?
The cost ranges between 300 usd and 1000 usd This cost varied depending on the materials and the size of the placenta pit opted for
Can a placenta pit be used for other medical waste?
Yes, it can be used for other non-hazardous medical waste like umbilical cords, though its better to first consult health care facility disposal guidelines
How long does a placenta pit last?
A placenta pit can even last for 10-20 years, depending on the size and frequency of use
What is the difference between a placenta pit and a general waste pit?
A placenta pit is specifically designed for disposal of biological waste for example, placentas, whereas a general waste pit is used for non-hazardous solid waste